Showing posts with label outdoor. Show all posts

Wednesday, November 6, 2013

Lady Bug Tire Swing


Lady Bug Tire Swing
 
Lady Bug Tire Swing


This is how I made a Lady Bug Tire Swing.

 After cleaning an old tire with bleach and Dawn dishwashing  liquid,
I spray painted it with
Rust-Oleum Plastic Primer gloss red spray paint from Walmart and painted  the face and spots with black exterior paint.

After the paint was dry I drilled drain holes in the bottom side where it looked like the water would accumulate the longest or in the lowest spots.


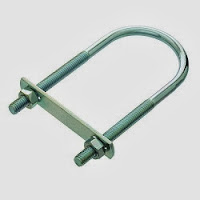
5/16 in. x 1-3/8 in. x 2-1/2 in.Coarse Zinc-Plated #320 U-Bolts 


and  three 5 foot sections of Everbilt #3 x 200 ft. Painted White Double Loop Chain Model # 12030 Internet # 202079568 Store SKU # 912840,


 a Lehigh 800 lb. 3/16 in. x 2 in. Stainless-Steel Quick Link Model # 7440S-12 from Home Depot,   


and a Lehigh 3-1/2 in. x 5/8 in. 110 lb. Nickel-Plated Steel Round Swivel Eye Bolt Snap Hook...Model # 7000S-12 from Home Depot.

.

I also had a strong rope that I tied to a tree limb.


I drilled holes in the tire for the U-Bolts and spaced them evenly around the top side of the tire swing. I attached each U-Bolt to each chain before inserting the bolts into the tire and bolted them down.

At the top of the chains I used the Quick Link to attach the chains together and the Swivel Eye Bolt Snap Hook. Then I attached the Swivel Eye Bolt Snap Hook (hook end) to the loop I made in the rope that was hanging from the limb.

Here is a link to a swing using similar hardware that you might want to check out!
http://janiszettel.blogspot.com/2010/06/were-swingin-group.html

Here is another link using a little different hardware you might want to check out! Great Diagram!
http://www.popularmechanics.com/home/how-to-plans/backyard-tire-swing-project
Hey! let me know you stopped by. I am anxious to hear your comments on any of my projects! How about a shout out for my adorable model!
 

Wednesday, October 30, 2013

Restoring a Metal Lawn Chair

Restoring a Metal Chair


Restored Metal Chair
 
I found a rusty old metal chair and wanted to restore it. This is my story.
 
First I cleaned it with some bleach water. I used a wire brush and dry cloth to wipe it down. I replaced a few bolts and nuts that needed to be replaced but was careful to retain what was left of the integrity of the chair.
RUST-OLEUM RUST REFORMER
Next I used Rust-Oleum Rust Reformer that I found at Walmart for $4.97. I coated the entire chair with two coats. It's a flat black color.
RUST-OLEUM Stops Rust Spray, American Red 
I let that dry a few days and then spray painted it with two more coats of Rust-Oleum Stops Rust Spray, American Red.
 
Turtlewax Paste Wax
Once the paint had cured or really after several weeks, I applied Turtle Wax Paste Wax. I found a small can with applicator at Walmart. Now we will just have to give the old chair the test of time. 
 
Here is the before picture.
 
 
What do you think?


Wednesday, October 23, 2013

Restoring Metal Frame Outdoor Dining Chairs


Restoring Metal Frame Outdoor Dining Chairs

I was so motivated after restoring the wood strip bench and glass table that I found the old worn fabric chairs and restored them also. The frames were good strong metal just like new. This is how I restored them.
I bought the WeatherShield 1 x 2 x 8 Pressure-Treated Pine Strips with the rounded edges for $1.97 each at Home Depot to replace the fabric on the 4 metal-framed chairs. I bought 12 of the 8 foot strips and they were cut into 18 inch sections. 

I weatherproofed them with two coats of BEHR PREMIUM WOOD COATINGS TRANSPARENT WEATHER PROOFING ALL IN ONE WOOD FINISH left over from weatherproofing our new deck. I spray painted the metal frames with gloss black paint.
 
I bought over 100 steel bolts and nuts and used an electric drill to drill through the wood strip and into the chair frame at the same time. Then I just inserted the bolts and tightened the nuts. It was easier for me to take it one strip at a time.
 
I am so pleased with the results. The chairs are so sturdy and unlike the cloth chairs, they don’t sag or sink down. After years of plastic chairs and cloth chairs, I am impressed with strength and stability of the new wood chairs. Now I have  all new furniture to compliment my deck.
metal frame outdoor dining chairs

This is the before picture you are not going to believe!

Wednesday, October 16, 2013

Restoring a Glass Top Outdoor Table

Restoring a Glass Table
weather proofed moinstue resistant plywood underlayment table top
Our outdoor glass table was blown over by the wind and shattered. This is how I restored it.
I used 1/4 in x 4ft x 8ft Moisture Resistant Plywood Underlayment from Home Depot to replace the glass table top. We had the plywood left over from another project.  All you have to do is turn the table upside down on the plywood and trace and cut. You'll have to take the table apart to insert the plywood. It fit perfect inside the frame where the glass had been. A center hole was cut with a jig saw for the umbrella.
I weatherproofed it with 4 coats of BEHR PREMIUM WOOD COATINGS TRANSPARENT WEATHER PROOFING ALL IN ONE WOOD FINISH left over from weather proofing our new deck. I really love this weather proofing product.
 I spray painted the metal frame gloss black.
This was an easy and fast project that gave me my table back for enjoying meals on the deck. I bought a new umbrella that I found reduced for $15 which was the only expense.
glass table top replaced with weather proofed plywood underlayment

No before picture this time. I couldn't bare to take one of the shattered glass.